Facebook Twitter RSS Feed

Chrome Car/ Chrome Paint


Chrome Car/ Chrome Paint


When chrome paint is applied to cars and bikes, it provides a unique shine to the vehicles. Using normal equipment such as a spray or an airbrush, chrome paint can easily create translucent chrome effects. Unlike a vacuum deposition, chrome paint can cover large areas and reach spots that a vacuum deposition cannot. To completely cover the coating so that nothing can affect the reflectivity, the metal can be coated with a conductive or non-conductive over coating.

With various types of chrome paint available, consumers need to be aware of the different types and its effects. One of the most popular chrome paint available is MirraChrome by Alsa Corporation. This paint produces a mirror chrome shine that can be done with a simple spray gun or an airbrush. MirraChrome can be used on any surface which includes metals, plastics, wood, foams, and much more. From trim pieces of the object and logos to full-scaled paintjobs, the possibilities are endless. Best results can be obtained using the standard HVLP spray guns or airbrushes. Another popular chrome finishing is the Ghost Chrome.

This type of chrome paint is mostly found on various OEM (Original Equipment Manufacturers) ranging from BMW wheels to Mercedes as well as Ford parts. Like the MirraChrome, Ghost Chrome can be applied with any standard spray gun. Usually this coating is to be applied over shades of gray ranging from light gray to black. Nevertheless, this paint can also be applied over any color to achieve metal type reflections and still remain transparent enough to display the underlying base color. If the chrome paint is too dull or lifeless, MultiChrome brings the best of both worlds. This spray-able chrome paint combines an intense prismatic color change effect with a mirror effect.

Cost effective and extremely exciting to work with, chrome paint is available in several types. With the popularity of street racing and car customizing at an all time high, car enthusiasts often use chrome paint to add a little extra to their tricked out rides.

What is MirraChrome®?

MirraChrome represents the latest in Reflective Paint Coating Technology. It can be referred to as Chrome spray paint, or Spray Chrome Reflective Paint or Chrome Paint. It's near microscopic particle content provides superior surface orientation. This particle alignment is the key to MirraChrome's shine. While many attempts have been made by others to achieve a "chrome paint" no one has come close. Through a rigorous development process we have established the specific
process and coatings to allow MirraChrome to achieve remarkable brilliance and be clearcoated. That's right, we said clearcoated. Alsa's MirraChrome can be topcoated with high quality automotive grade poly-urethane clearcoat such as Alsa's Speed Clear or any other topcoat without loosing its
true chrome look.

ALSA has the perfect clear for MirraChrome….. "Speed Clear"

MirraChrome can be applied with almost any type of spray equipment from airbrushes to full size HVLP guns.(We recommend Iwata's LPH50 detail gun.) MirraChrome comes ready to spray meaning no reducers or hardeners, just pour it in your gun and spray, when you're finished simply pour it back into it's container to use later.

MirraChrome can be used on any surface you can paint such as metals, plastics, wood, foams etc. From trim pieces and logos to full blown custom paintjobs the possibilities are endless even use it to touch up real chrome! Got a scratch in the worst place? Blend it away with MirraChrome.

MirraChrome has no equal. Other companies are selling coatings which are simply a version of our Ghost Chrome - no product to date can compare to the reflection rate of MirraChrome. Many other have tried without success to bring you a top-coatable chrome spray. Only Alsa has done it! Using our complete MirraChrome kit, and following the required dry times, and application recommendations you can achieve a clear coated and completely durable finish 95-98% that of true chrome. Try it and see regardless of what they say there IS a chrome spray that can be topcoated and doesn’t look like simple spray paint when finished and it’s called MirraChrome.


How to Apply MirraChrome

MirraChrome will create a mirror finish as long as your surface
is as smooth as glass. Please follow these steps for best results:

Step 1. - Begin by covering your surface with a black basecoat.

Step 2. - Lay down a clear coat, preferably our Alsa Speed
Clear, which is very low in solvents (Remember to use 4 parts
Alsa Speed Clear to 1 part Alsa Speed Hardener). In order for
the finished product to achieve a true chrome look we
recommend you wait 7-10 days to allow the clear to fully
cure before wetsanding and buffing.
Make sure to use a soft
lint-free rag. If your surface already has a glass l ike sheen,
move on to step 3.

Step 3. - Thoroughly clean the surface with an alcohol or
alcohol/water solution and dry, taking care to insure it is
streak free.

Step 4. - Begin applying MirraChrome using a dusting effect,
(very small volume of material with a substantial amount of
air). If you are using an H.V.L.P. gun you should be around
20 p.s.i. otherwise use whatever the recommended air
pressure is for your gun, remembering to keep the material
volume very low. Continue applying the MirraChrome until
desired effect is achieved. Wait as long as possible, at
least 24-48 hours, to allow tail solvents to fully evaporate.

Step 5. - (Optional) Some customers have stated that
heating the surface with a heat gun or hair dryer will
actually improve the appearance even more as well as help
to speed the outgasing of tail solvents.

Step 6. - Use a very soft lint-free cloth to remove any of
the excess dust/overspray from the surface. If you complete
this step you will notice a drastic improvement in the
final appearance.

Step 7. - Top with your final poly-urethane clear coat.
You can add Candy Concentrate tints to your top clear coat
to achieve any color chrome you desire.

Step 8. - Let cure then sand and buff as needed.

Floating Trunk


NOTE:
Refer to above picture for steps 1-3.

1)
This part must be cut out. You must measure
1/2 of the thickness of the bar, and cut exactly that
much above the hole you are about to drill to make
it sit flat (not leaning back).


2)
Remove this screw. Drill a new hole here, right
through the stock hole. This will be the pin that
trunk rotates on. The stock hole is slotted. Make
sure the pin fits loosely, which will allow it more
play so it will sit sideways.

3)
Drill a NEW hole here (not through the other
stock hole). This will be the pin you remove.
You can replace this pin, to lock it back into
stock operation. Make sure this hole is drilled
near exact diameter of your pin or your trunk
will sit up too high.

4)
Remove the stock screw. You will have to
grind the inside a bit, to allow it to clear the
bar, unless you cut you hole to big. Don't
grind too much, so you can still replace the
stock screw if you want to get rid of the flip flop.

NOTE:
If you have a wing, tighten the springs
to make it stay up. I had to shorten mine.
.
The trunk will now sit sideways OR sit like a
normal flip flop.

Pics of the finished product:


Floating Hood


Parts needed:

*(2) 4" heavy-duty strap hinges. ($5)

*(6) self drilling/tapping screws (if you don’t want to use these you can use regular

screws but you have to pre-drill your holes). ($0.50)

*(2) strong 10" wire ties. ($0.10)

*A few inches of tape (any kind).


Tools:

*Drill (Phillips drill bit).

*Ratchet

*Hammer

Preparing:

What you want to do is make the hole closest to the narrow part of the hinge a little bigger than it already is so your factory bolt will go through it for step #2. Your next hole, which you will start, will be drilled in the middle of the hinge and to the left of the hole closest to the folding

part of the hinge as pictured. The 2 holes drilled will line up perfect to your stock hinge holes. This step is important because it will align your hinges for correct hood positioning.

Instructions:

*Please remember to take your time and be patient. I did this conversion by myself, but if a friend could help you with the process it would make it easier for you. This mod takes about 1-2 hours. Please do this mod at your own risk…

*due to a large amount of emails we have daily, I will not answer any tech support ?’s just because everything you need to know is in this document, thank you.

1. I know this seems a little obvious, but please do one side at a time. Unbolt the factory hinge from the hood with a ratchet.

2. Place the strap hinge flat between the hood and the hood hinge. Bolt the factory bolt in the bottom hole (the one that you drilled prior) and align the strap hinge so that it is even/flat with the top of the factory hinge. This will be the position for the hinge to fold correctly.

Use a little piece of tape to hold the hinge in place so that the drilling will be easier.

3. Use two of the self-drilling/tapping screws in the bottom 2 hinge holes to bolt it in place. Take off the tape and then use slight pressure or a hammer to bend the top of the hinge inwards or you hood will not close! (be careful not to damage you hood by hammering like in the picture)

4. Use another screw in the top hole of the strap hinge. You can now unbolt the factory bolt from the hinge and let it dangle. This is what it should look like…

5. Now, use one of your wire ties to secure the factory hinge to the strap hinge. Don’t worry, wire ties are exceptionally strong--that’s why the cops use them! Do exactly like pictured so your hood will close correctly. Pull the tie as firm as you can to secure it.


6. Now go through this exact same process on the other side. You will need to remove the washer fluid hose from the connector so your hinge can be placed there. You can tape the hose around the hinge.

7. Now for the final step. Your hood has factory stops so that it can only go back so far. If you want your hood to produce more of an angle I would suggest bending the stops out of the way with a screwdriver (plus it looks way better!). Be very careful and patient so that you won’t bend you hinges off of track…

8. If for any reason you want your hood back to normal, remove

the strap hinges and bolt in your factory bolts back where they were

before. It’s that easy!

YOU ARE NOW DONE!!! START SHOWING OFF!!!

YOUR HOOD WILL OPEN AND CLOSE NORMALLY!!!!!!!!

OR YOU CAN OPEN YOUR HOOD IN OVER 10 DIFFERENT POSITIONS

Toyota Celica Generation 1


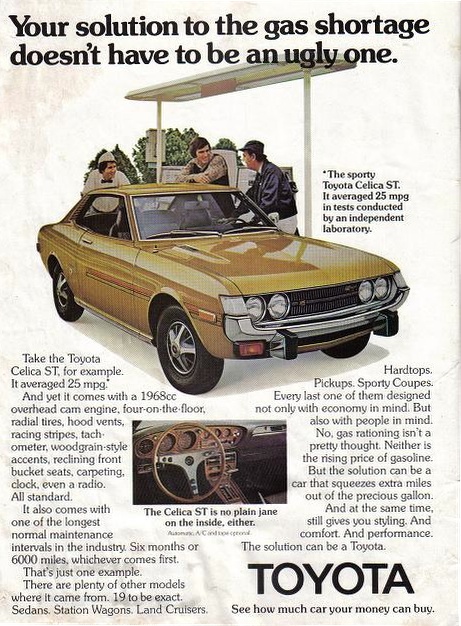
The original Celica dated back to the 1970 Tokyo Motor Show, where it shared media attention with the Carina. At launch there were two versions available, the LT (entry level) and ST (upmarket), both aimed at being more affordable versions of Toyota's sportscar, the 2000GT.

The lower-end LT was equipped with a 2T carbureted four-cylinder engine displacing 1,588 cc, while the ST came with a twin Solex-carburetor 2T-B derivative of the 1,968cc Corona 2000 engine. The latter engine used a cast iron block, alloy head, and a chain driven single overhead camshaft.

With a compression ratio of 8.5:1, the 2 litre version was good for 95 bhp @ 5000 rpm. There was also a GT version, with a more highly developed version of the 1,588cc engine, which developed 118 bhp @ 5,800 rpm thanks largely to the twin Mikini-Solex Carburettors.

At its introduction the Celica was only available as a pillarless hardtop. The SV-1 liftback was shown as a concept car at the 1971 Tokyo Motor Show. With slight modifications, this was introduced in Japan in April 1973 as the 2000 cc RA25 and 1600 cc TA27 liftbacks. It was then exported to Europe in RHD form as the 1600 cc liftback.

The first iteration of the Celica featured a slant nose (trapezoid-like shape front corner light), and was available as a Coupe model only, designated the TA22, RA20, and RA21. These models were released from 1970 to 1975 and came equipped with the 2T, 2T-G 1.6 litre, or 18R 2.0 litre engine, although those bound for the US came with the 18R engine.

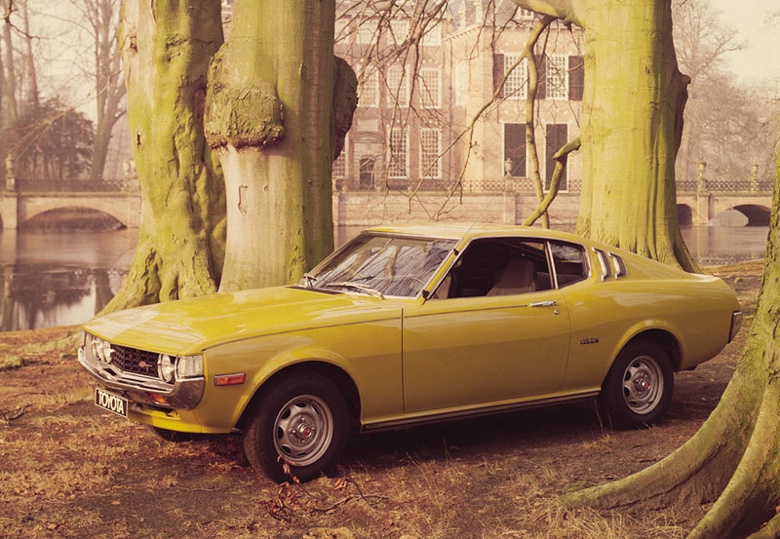
A minor revision would see the 95" wheelbase extended by three inches to 98", and minor changes to the front giving the car a flatter nose and square front corner light. Although the revised model made its debut in Japan in 1974, export models were only released for the 1976 model year.

From 1972 to 1974 US bound Celica's were fitted with the 2.0 litre 18R-C engine. It increased in size again for the 1975-1977 models, now being fitted as standard with the 2.2 litre 20R engine. The Celica GT and LT models were introduced in the U.S. for the 1974 model year. The top-line GT included a 5-speed manual transmission, rocker panel GT stripes, and styled steel wheels with chrome trim rings.

Other changes for 1974 included minor changes in the Celica's trim and badges, and an automatic transmission became an option on North American ST and LT models starting in the 1973 model year. For 1975, the '74 body was used, but body-color plastic fascia and sturdier chrome and black rubber bumpers, replaced the chrome bumpers used in the earlier cars (in accordance with US Federal bumper laws).

The First Facelift


In October 1975 the entire Celica lineup was given a facelift, with a revised front bumper and grille arrangement. The new model numbers were RA23 worldwide (RA24 US) for the coupe, and RA28 worldwide (RA29 US) for the liftback. The American Liftback was a GT (RA29) with a 2.2 litre 20R engine. All the Liftback models, which were commonly referred to as the 'Mustang' shape, had flat noses. Although there was no "B" pillar in the Liftback, the rear windows did not roll down (as they did in the hardtop coupe).

Although they looked the same, there were a few minor visible differences. The facelifted coupe was coded RA23 with an 18R engine, or RA24 with a 20R engine. Also available was the TA23, which was similar to the RA23, but with the T-Series engine. The RA23 and RA28 had a more distinctive bulge in the bonnet, or hood, which was lacking in the TA22 or RA20 Coupe and in the TA27 and RA25 Liftback Celica. The TA22 Celica also had removable vents mounted in the bonnet, which the RA23 and RA28 lacked. The RA series also had an elongated nose to accommodate the larger engine. The door vents, fuel filler cap, and interior were also different between the TA and RA series.

Although the Liftback was virtually the same size as the then current ST, being 0.8 inches shorter overall, the same width (63.8 inches) and 0.6 inches lower, and with the same 98.2 inch wheelbase, the car did appear to be noticeably larger and better balanced. And of course the liftback added to the cars versatility, however there was a drawback - the extra metalwork and glass area added considerably to the Celica Liftback's weight, it now tipping the scales some 210 lb. heavier than the ST. A five-speed gearbox was standard, with a true over-drive top gear pulling 20.1 miles per hour per 1000 rpm.

The suspension setup was conventional, using MacPherson struts at the front, and a well-located live axle at the rear, with trailing links. The Liftback also differed from the ST in running on 14 in. diameter wheels shod with Dunlop SP sport tyres, with 165 section. With its greater weight and higher overall gearing, the liftback was slightly slower than the ST, however on the credit side many found the liftback exceedingly smooth and easy to drive, the power curve being sufficiently smooth to allow the engine to be taken right up to the rev counter red-line at 6,500 rpm.

Standing starts produced just the right degree of wheelspin to keep the engine on cam; there was no hint of time wasting axle tramp. As was usual of Japanese cars of the time, the gearbox was superb, with the lever biased just correctly into the centre, 3rd/4th gear plane. Fifth was up and to the right, reverse being guarded by a further slight movement to the right down from the neutral plane, and down. In the lower three gears, maximum speeds at 6,200 rpm were 33.53 and 77 mph, while in fourth, pulling 17.4 mph/1,000 rpm, it was possible to break the 100 mph mark, at just over 5,700 rpm. The liftback reached 40 mph in 6.1 seconds, 50 in 8.7 and 60 in 12.7, with the quarter mile mark being passed in 18.8 seconds. The 0-60 mph time compared to 11.4 seconds for the Ford Capri 2000S and 11.2 sec for the Vauxhall Cavalier GL coupe.

As was becoming common in the early 1970's, the Celica was yet another Japanese car which ran on the lowest grade (and least expensive) two-star grade fuel. This fact, allied to the overall figure of 27.8 mpg, made the Celica a remarkably economical car to run. At a constant 70 mph, consumption was still the right side of 30 mpg (30.5 mpg to be exact), but reviewers of the day noted a noticeable faIl off in economy at higher speeds, and flat-out driving around the 100 mph mark put consumption down to around the 16-17 mark.

The main instruments included a speedometer (left) with press-to-zero trip reset, and rev counter (right) with direction indicator and main beam warning lights between. The centre panel housed the clock, oil pressure, ammeter, coolant temperature and fuel gauges. Vertical rows of warning lamps operated only on brake circuits on UK cars. Four slides for heater control, with heated rear window switch to right as standard and FM / AM radio. The bonnet release was beneath the fuse panel on right. The horn buttons were located on the steering wheel spokes.

When hustled into corners the Celica exhibited much less roll than contemporary family sedans.

There was no major increase in the understeer as speed rose and, ultimately, the car would tend to run a little wide. Really violent cornering would lift the inside rear wheel, but even under these conditions, the car remained remarkably stable.

At over 95 mph, the front of the car could start to feel a little light, a small spoiler would have improved things much better than the vestigial lip over the tailgate. Noise levels were low although, at over 5,000 rpm, the engine was plainly working pretty hard, with a good deal of mechanical thrash. Generally, however, overall levels were well within acceptable limits.

In braking the Japanese made great advances in the early 1970's, thanks largely to their participation in world-wide competition events. The disc-front, drum-rear set-up, with a vacuum servo, gave the Celica a very sure-footed feel. was is ideal, with 20lb pedal pressure needed for in-town check braking (around the 0.3g mark), while 70lb would give a near-perfect 1.Og stop, with just the slightest squeal from the locking rear tyres and not much nose dip.

After reading countless reviews, it is evident the Celica's brakes stood up well to the fade test, with pedal pressure needed for the 0.5g stop rising on average from 30-25lb for the first stop to 40-50lb.

There lift back facility turned the traditional limited-space sports coupe into a sensible load carrier. The tailgate on the Celica had a key-only lock, and was supported on a pair of gas-filled struts. With the back seat in position, there was 10.3 cu. ft. of luggage space against the 7.7 cu. ft. in the standard Celica, and this could be increased to a really sensible 25 cu. ft. with the rear seat folded flat, although the rear suspension mounting covers did take up a fair amount of room.

The problem of covering up luggage, always a problem in liftback coupes, was solved in an elegant manner. A simple "roller blind" was attached to the rear of the back seat and this could be simply pulled out and attached by press studs, either to the edge of the tailgate or to the sill. In the first position, the "blind" simply unrolled itself to cover the luggage as the tailgate was closed. A further refinement was the provision of a V-shaped webbing strap to stop a single suitcase from sliding about on the carpeted floor. The spare wheel and the useful tool kit were stowed in lidded lockers beneath the boot floor

While the front seats were comfortable, they did lack sufficient wrap-around to provide sufficient support in cornering. Also, the padding tended to feel a bit thin after a long trip. These criticisms apart, the seats were not over-bulky, allowing rear seat occupants, whose leg and head room was restricted, to make the most of the available room. The rear seats, with deep "buckets" either side of the thinly-padded transmission tunnel, were adequate for children, but a bit cramped for adults. Owners soon discovered that the wells made a useful place to carry small, fragile items when the rear seat was folded down.

The driver had a very full span ot instruments, all very clearly lettered. In front of the driver was the rather wildly optimistic speedometer (reading 77 at a true 70 mph), with a push-button trip recorder (three per cent over-reading), and the rev counter, yellow-lined from 5,400 rpm, red-lined from 6,500 rpm: In the centre of the facia, and with their anti-reflection cowls angled towards the driver, were the combined fuel and coolant temperature, oil pressure and ammeter dials, with the clock separate. An ammeter was fitted, which of course gives much more information than a battery voltmeter. A vertical row of warning lamps on UK specification cars contained just the handbrake "on" and hydraulic fluid level lamp. For other markets the lamps were linked to an electro-sensor system which monitored items like engine oil, battery and the windscreen washer reservoir.

The Celica was successful in the showrooms of the world. It was not particularly powerful, and demonstrated regulation handling and performance. No, it was not a drivers car, but it looked the goods and did everything you asked of it with typical Japanese efficiency. Sure, you could spend the same amount of money on a British sports car, and for some that would make a better choice. But for those that wanted the assurance of their car starting each and every morning with monotonous reliability, the Celica was a hard car to pass up.


Toyota Celica Gen5 Images part 2

Toyota Celica Gen5 Images part 2